
How To Capture An LED Display On Camera (So It Looks Good!)
February 22, 2023 by guest author, Zach Todd
I was sifting through Linkedin last week and saw a company’s post celebrating the installation of a set of outdoor LED screens, and using a set of photos that made the screens look like junk.
I’m sure they weren’t junk, but it reinforced the challenges of marketing a product that can look amazing to naked eyes, but much less so when photographed. A couple of days later I saw this post put up by led manufacturer SNA Displays, and I asked if I could repurpose it here as a guest post that explains the problem and lays out solutions.
Guest Post: Zachary Todd, SNA Displays
 Have you ever taken a still photograph or video footage of a digital display, only to look at it later and see some kind of distortion or interference?
It may be disconcerting, and it may cause you to question the quality of that digital display, but distortion does not necessarily indicate a defect in the display.
So, what’s keeping you from getting a good picture?
Well, let’s discuss a few reasons you might be seeing an interference pattern or “noise” in an otherwise normal photograph of an LED display.
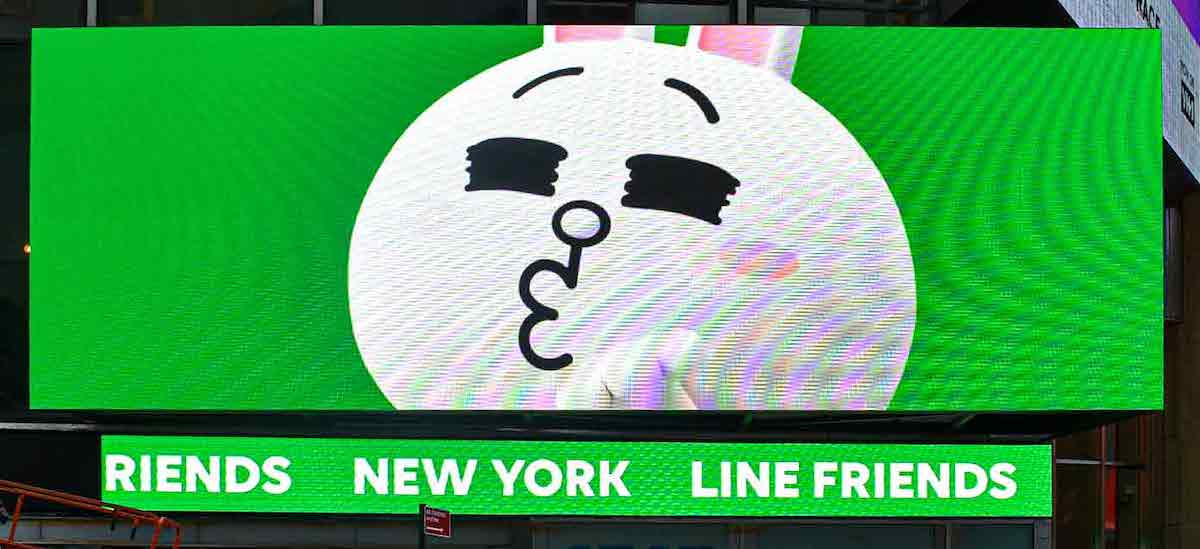
THE MOIRÉ EFFECT
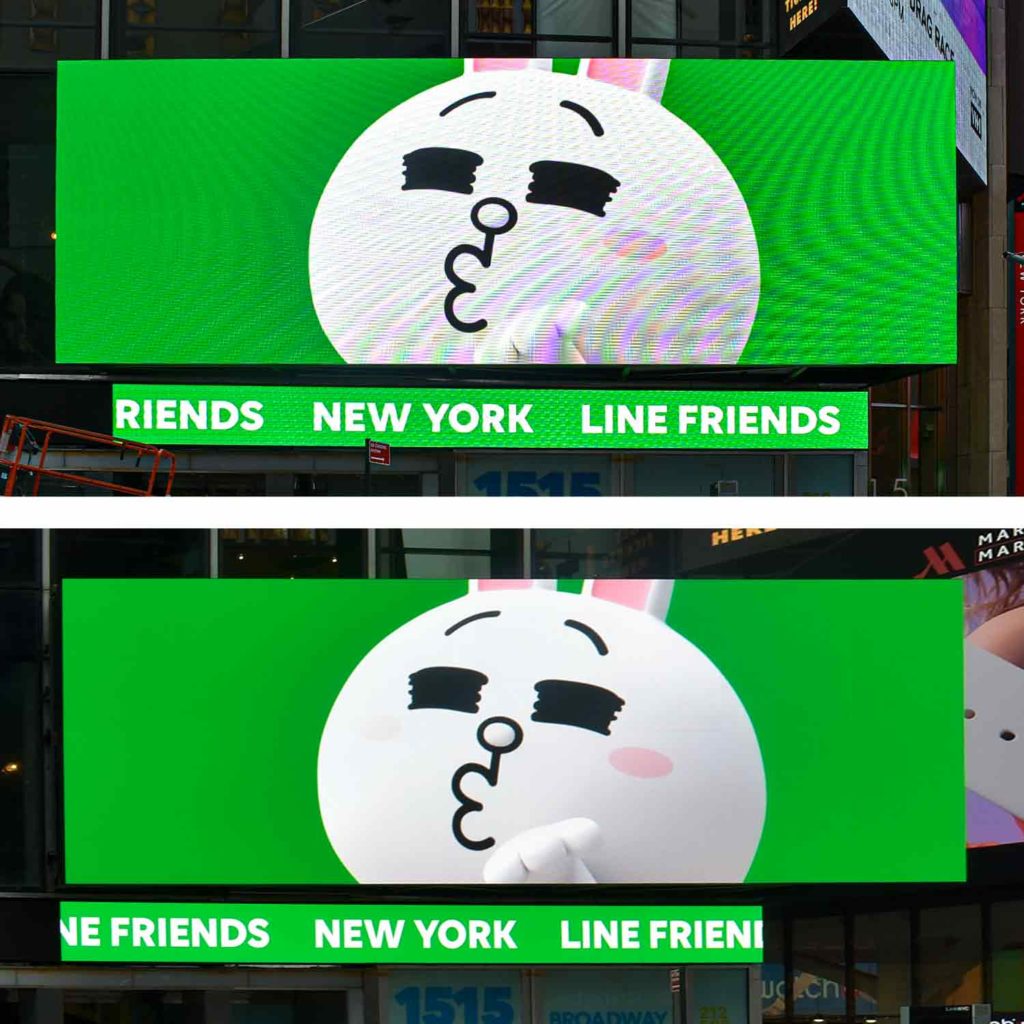
The moiré effect (pronounced mwar-AY) is named after a type of textile with a rippled or wavy appearance. Also known as a moiré pattern or moiré fringe, this effect typically occurs in mesh patterns such as certain weaves of clothing, screens, and other grid patterns.
Have you ever seen someone on TV wearing a houndstooth pattern? The effect can be distracting, to say the least. You can also demonstrate moiré effect by overlaying two metal screens (e.g., mosquito netting on a screened-in porch) and twisting one so the grids are skewed.
The moiré effect commonly appears in digital displays, especially when viewed through the lens of a digital camera, where rows and columns of pixels can create a complex grid pattern. Digital cameras use a charge couple device (CCD) to convert light into pixel information, thus producing a picture. When the grid pattern of the CCD sensor in the camera is incompatible with the grid pattern of the void area (the space between pixels)—when the grid is twisted at certain angles—it creates a disharmonic image.
It’s important to note that it is the space between pixels, not the pixels themselves, that causes the moiré effect.
Because different digital displays have varying pixel sizes, pixel pitches, and total number of pixels – creating vastly different grid patterns – the moiré effect can vary widely from display to display. Camera settings like zoom and aperture also change the factors that produce the effect.
The effect, which is a physical property and therefore does not indicate a defect of the display, occurs as the viewer’s perception of the spaces within the grid changes. Typically, a photographer can mitigate the moiré effect with slight changes in viewing distance, viewing angle, camera zoom, or focus.
For better results, have your camera operators keep the surface of the display in soft focus, near the edges of sharpness. In other words, if there’s an object in front of the display, put the focal point on the object and not the display itself.
CAMERA ANGLES
Louvers
 LED screens often consist of louvers, which are horizontal slats above pixels. While louvers provide some protection from environmental factors, they also direct light output and create contrast for a display. If a picture is shot from a steep angle below or above a display, louvers can obstruct the view of LEDs and result in a distorted view of the display content. Photographers can usually avoid negative effects caused by louvers by first looking through their camera’s viewfinder.
Angles
Shooting LED screens from wide angles can also be problematic, depending on the diode technology employed throughout the display. Diodes are manufactured at widely different viewing angle specifications, and you should always photograph your display within its optimal viewing cone for best results.
Second, much like with the louvers described above, it’s possible to take a picture at an angle that causes some diodes to obstruct the view of others. This is especially true of displays that employ discrete LEDs, which extend outward beyond the surface of an LED screen, making it more likely to block the view of other LEDs at different angles.
LIGHTING AND SHUTTER SPEED
Ambient light is an important part of any photography discipline and the same is true for photographing digital displays. Too much could cause your picture to be overexposed, but light that competes with the light output of the display itself can substantially reduce the quality of your photo. Try taking your photo from the shaded side of the screen or increase the brightness of your display. Keep in mind that you should always deactivate your camera’s flash feature when photographing LED displays.
At night, you may need to reduce the brightness of the display, as there could be minimal competing ambient light which tends to produce an overexposed or “washed out” image.
Likewise, using a fast shutter speed could prevent the camera from taking in enough ambient lighting to get a good image, causing the illumination to be lost. But, if the camera isn’t steady, a slow shutter speed could cause a blurred image. Plus, if the shutter speed is too slow than the image will be washed out.
REFRESH RATE AND DIGITAL CAMERAS

The images you perceive on a digital display are actually being replaced over and over and over. This is known as refresh rate, and it is expressed in hertz. In fact, the light output by diodes is being refreshed so quickly that the human eye is unable to detect anything other than a clear static image or smooth video.
For LED displays, the rate at which images are replaced varies widely. (As you probably know, some LED display providers market inflated or misleading specifications, and this one is no different.)
However, when capturing images or video of an LED display on camera, you may notice distortions in the form of horizontal lines. This is likely due to the speed at which your camera is capturing images. We’ve all seen computer monitors wildly flickering in the background of a live TV shot, and the scan lines captured by your digital camera are no different.
To improve your chances at getting a clean shot with minimal interference, reduce your camera’s shutter speed to bring it more in line with the refresh rate of the video screen. Keep in mind that as you adjust shutter speed you are also adjusting the exposure, so you may need to compensate with a reduction in aperture or ISO to let in less light. For most smart phones, you can also adjust your camera’s frame rate, typically expressed as frames per second (fps).
About The Writer
Zachary Todd is a communications coordinator with SNA Displays and works out of the company’s Dallas office.
Leave a comment